Installation via kubectl
Step 1: Navigate to Cluster Orchestrator in the Cloud Costs Module
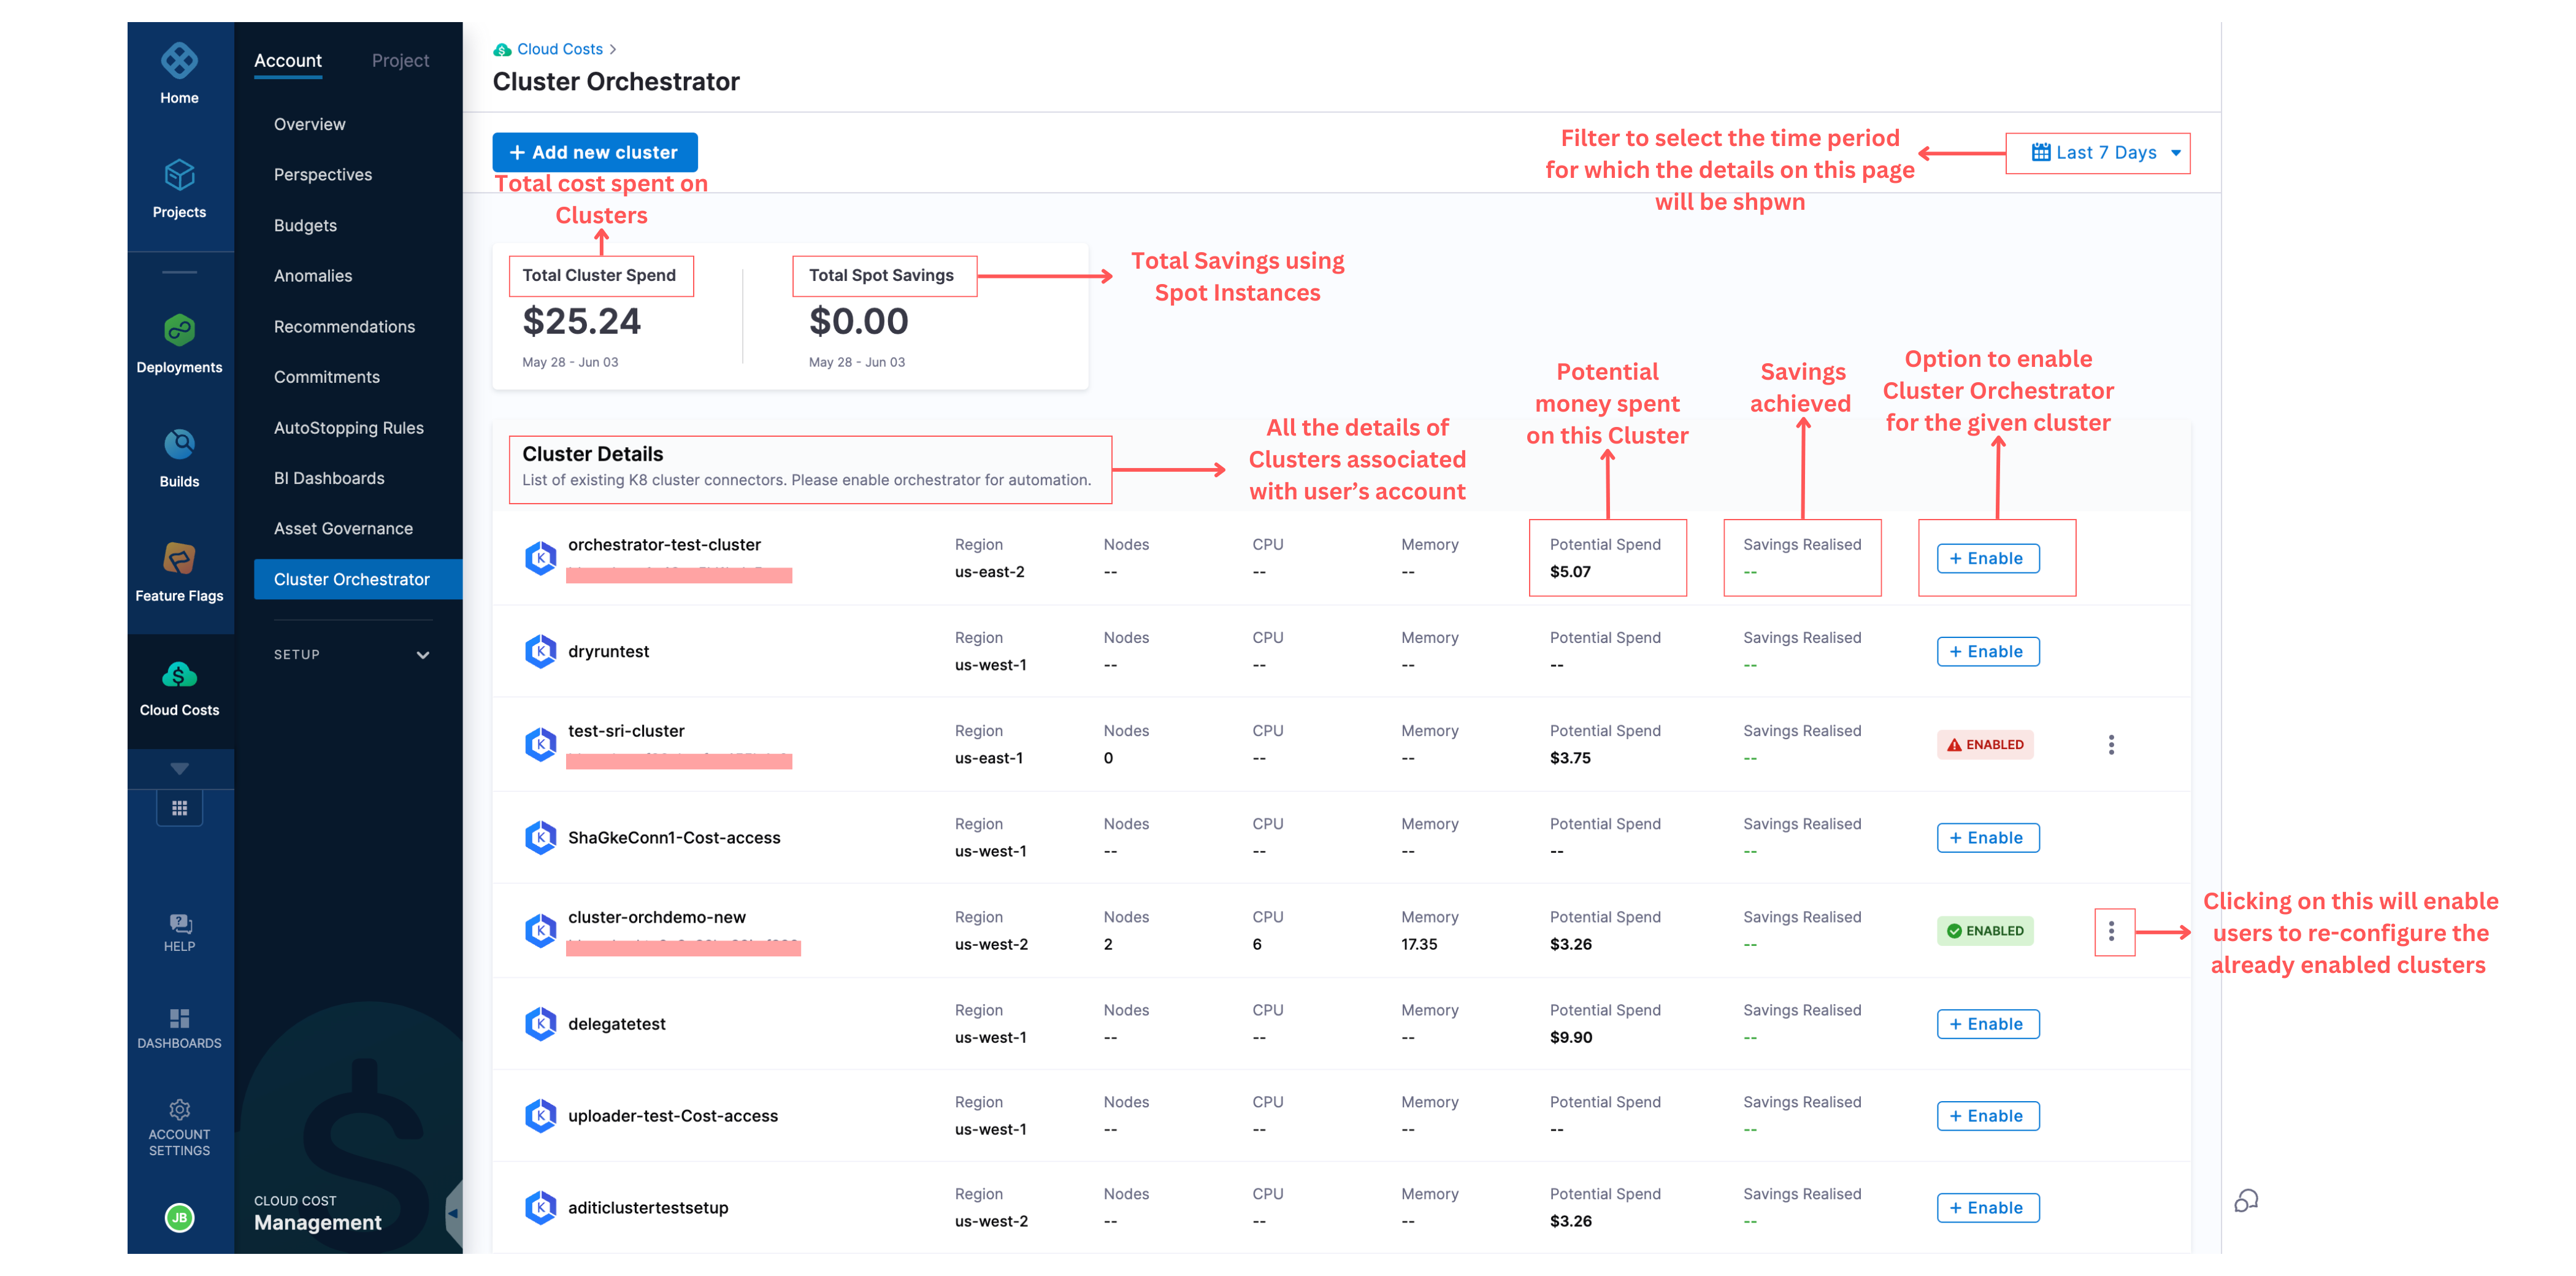
Click on Cluster Orchestrator from the navigation bar. Once you click on it, you will be taken to the home page, where you can see all the clusters associated with your account.
For each cluster, you can see the following information after Cl:
- Name of the cluster
- Region of the cluster
- Number of nodes associated with the cluster
- CPU
- Memory
- Potential spend of the cluster
- Savings realized
- Whether the Cluster Orchestrator is enabled for the particular cluster
On this page, you can also see the total cost of the clusters and the spot savings.
Step 2: Enable the Cluster Orchestrator for a Selected Cluster
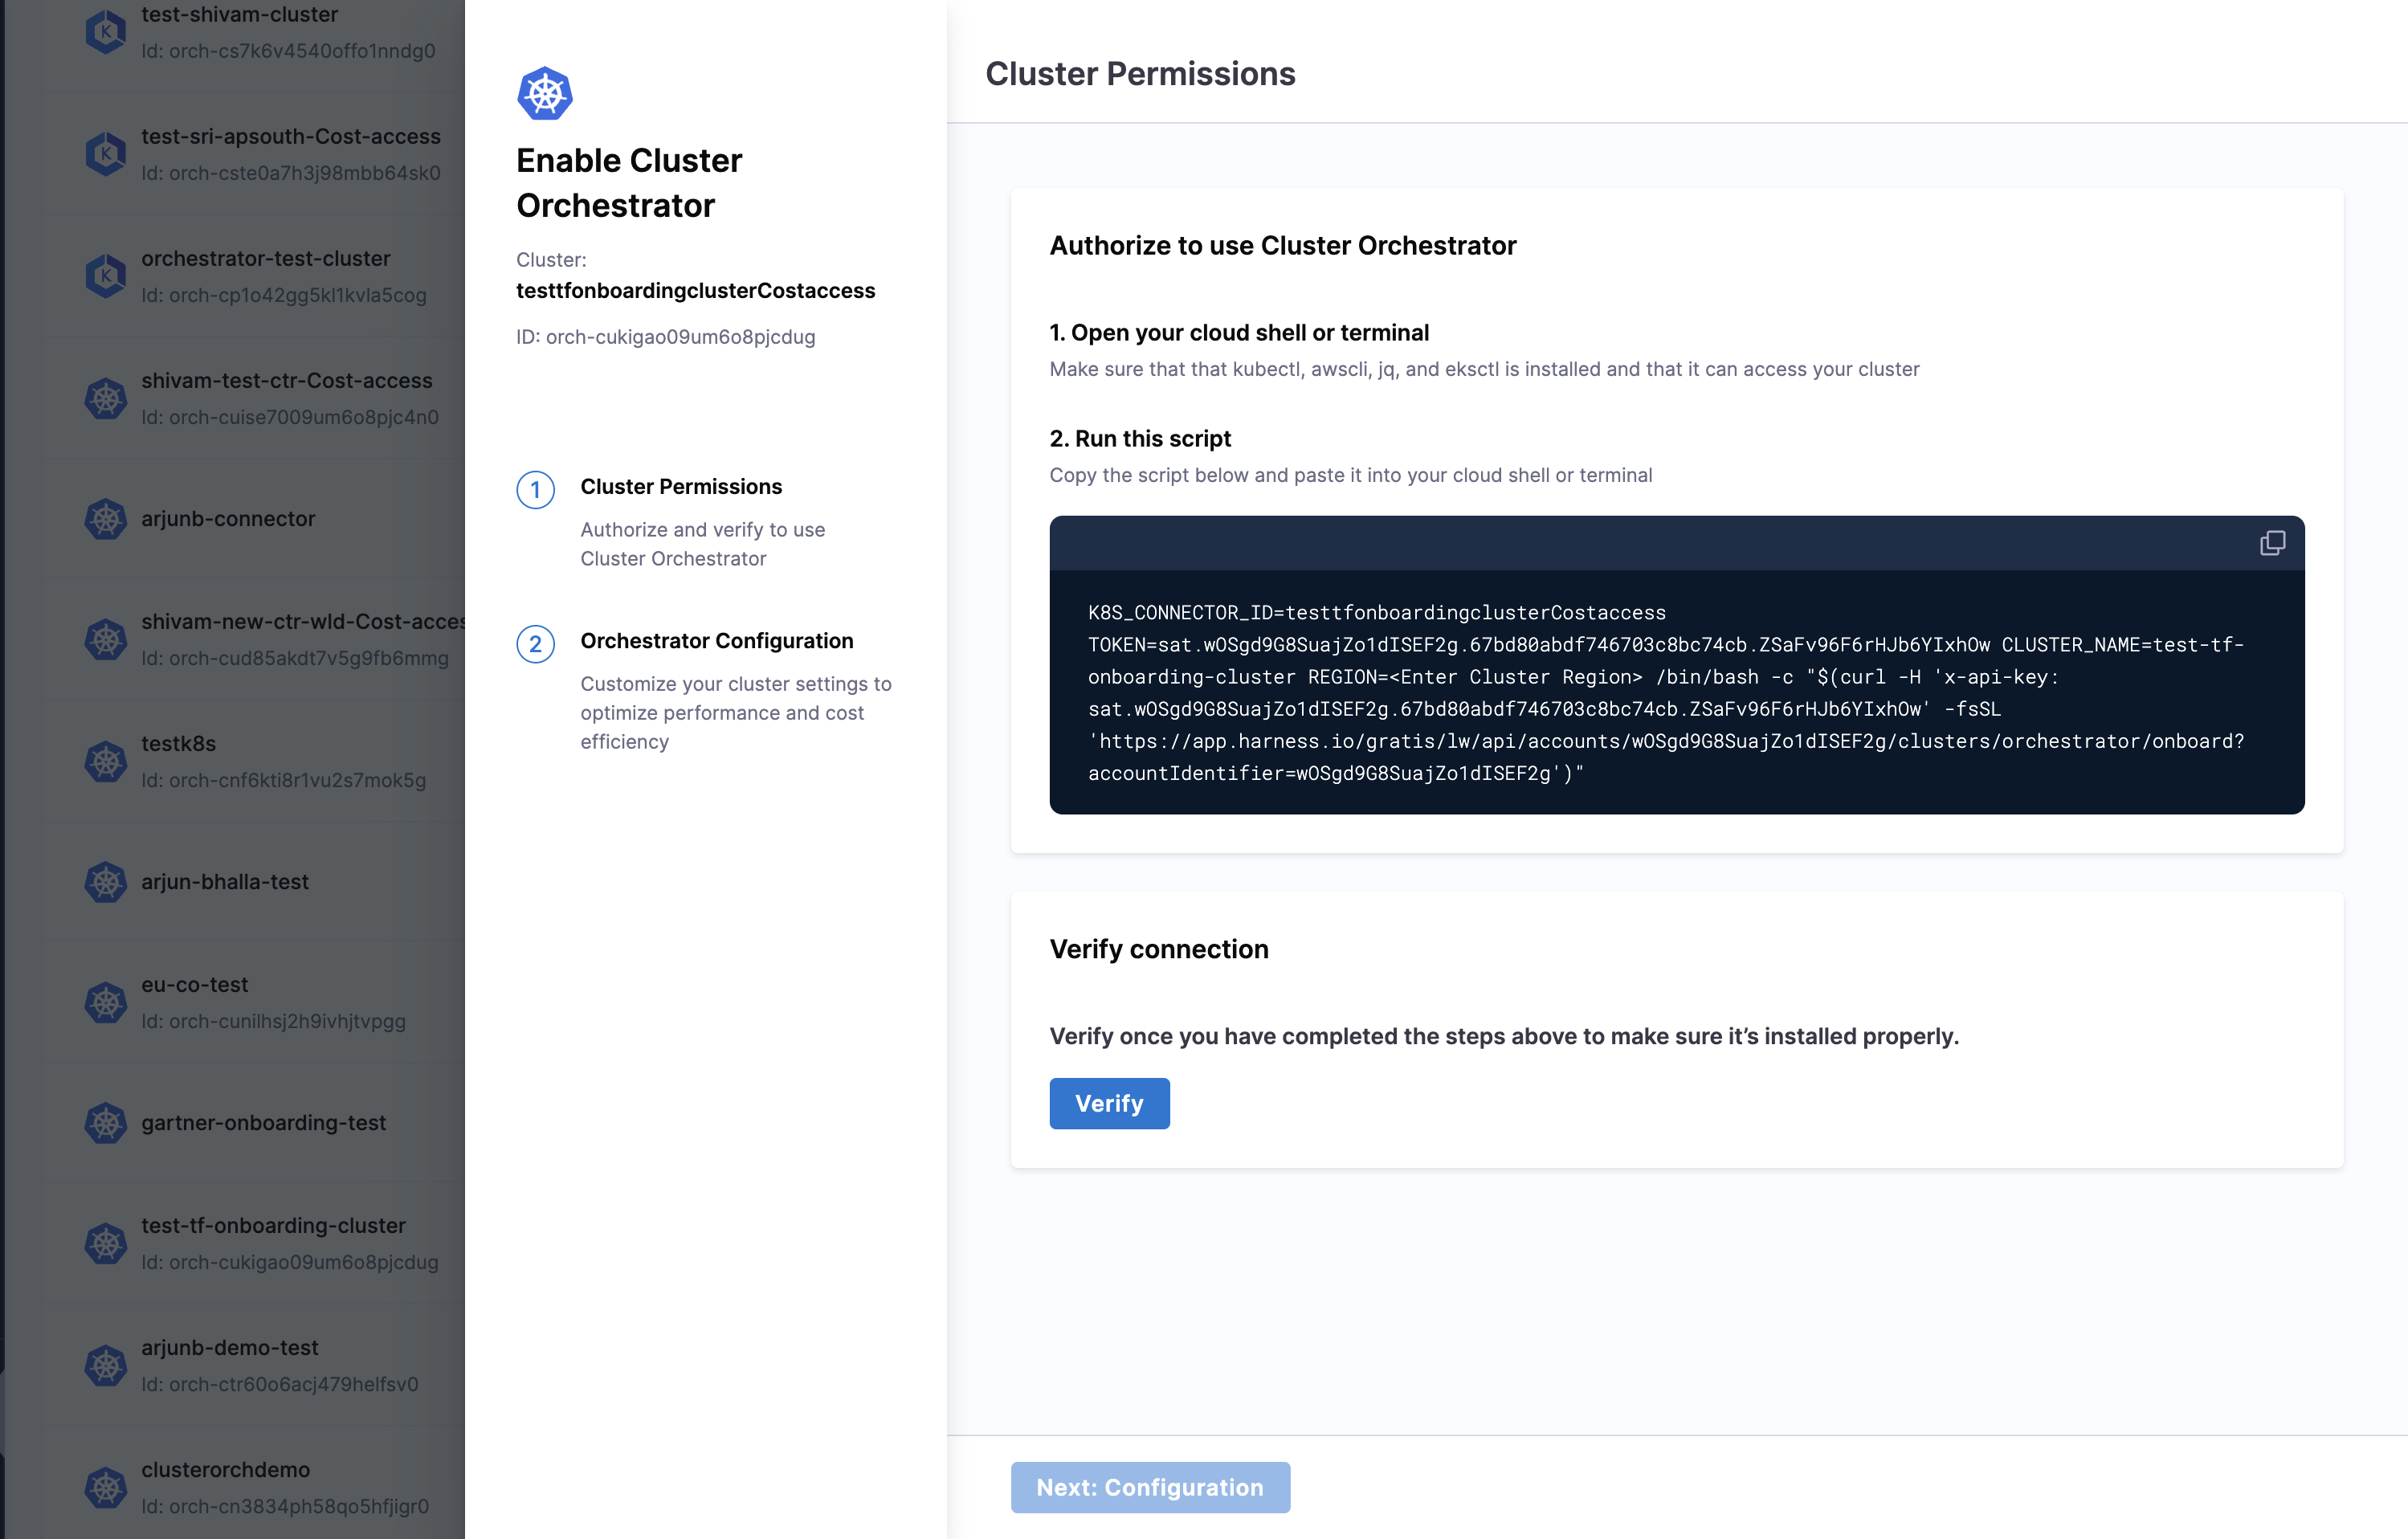
For a given cluster, click on the enable option, which will take you to the enablement screen. To enable the Cluster Orchestrator for the particular cluster, there are two steps to complete:
Step A: Cluster Permissions
You will be asked to run a shell script in your terminal and verify the connection. Upon successfully establishing the connection, click on the next step to configure.
Step B: Orchestrator Configuration
In this configuration screen, you'll customize how Cluster Orchestrator optimizes your infrastructure through three powerful control panels.
- Cluster Preferences
- Spot Preferences
- Replacement Schedules
Cluster Preferences

The Cluster Preferences section is where you'll configure the core optimization behaviors of Cluster Orchestrator. These settings directly impact how your cluster resources are managed, scaled, and optimized for cost efficiency.
Enable Commitment Context
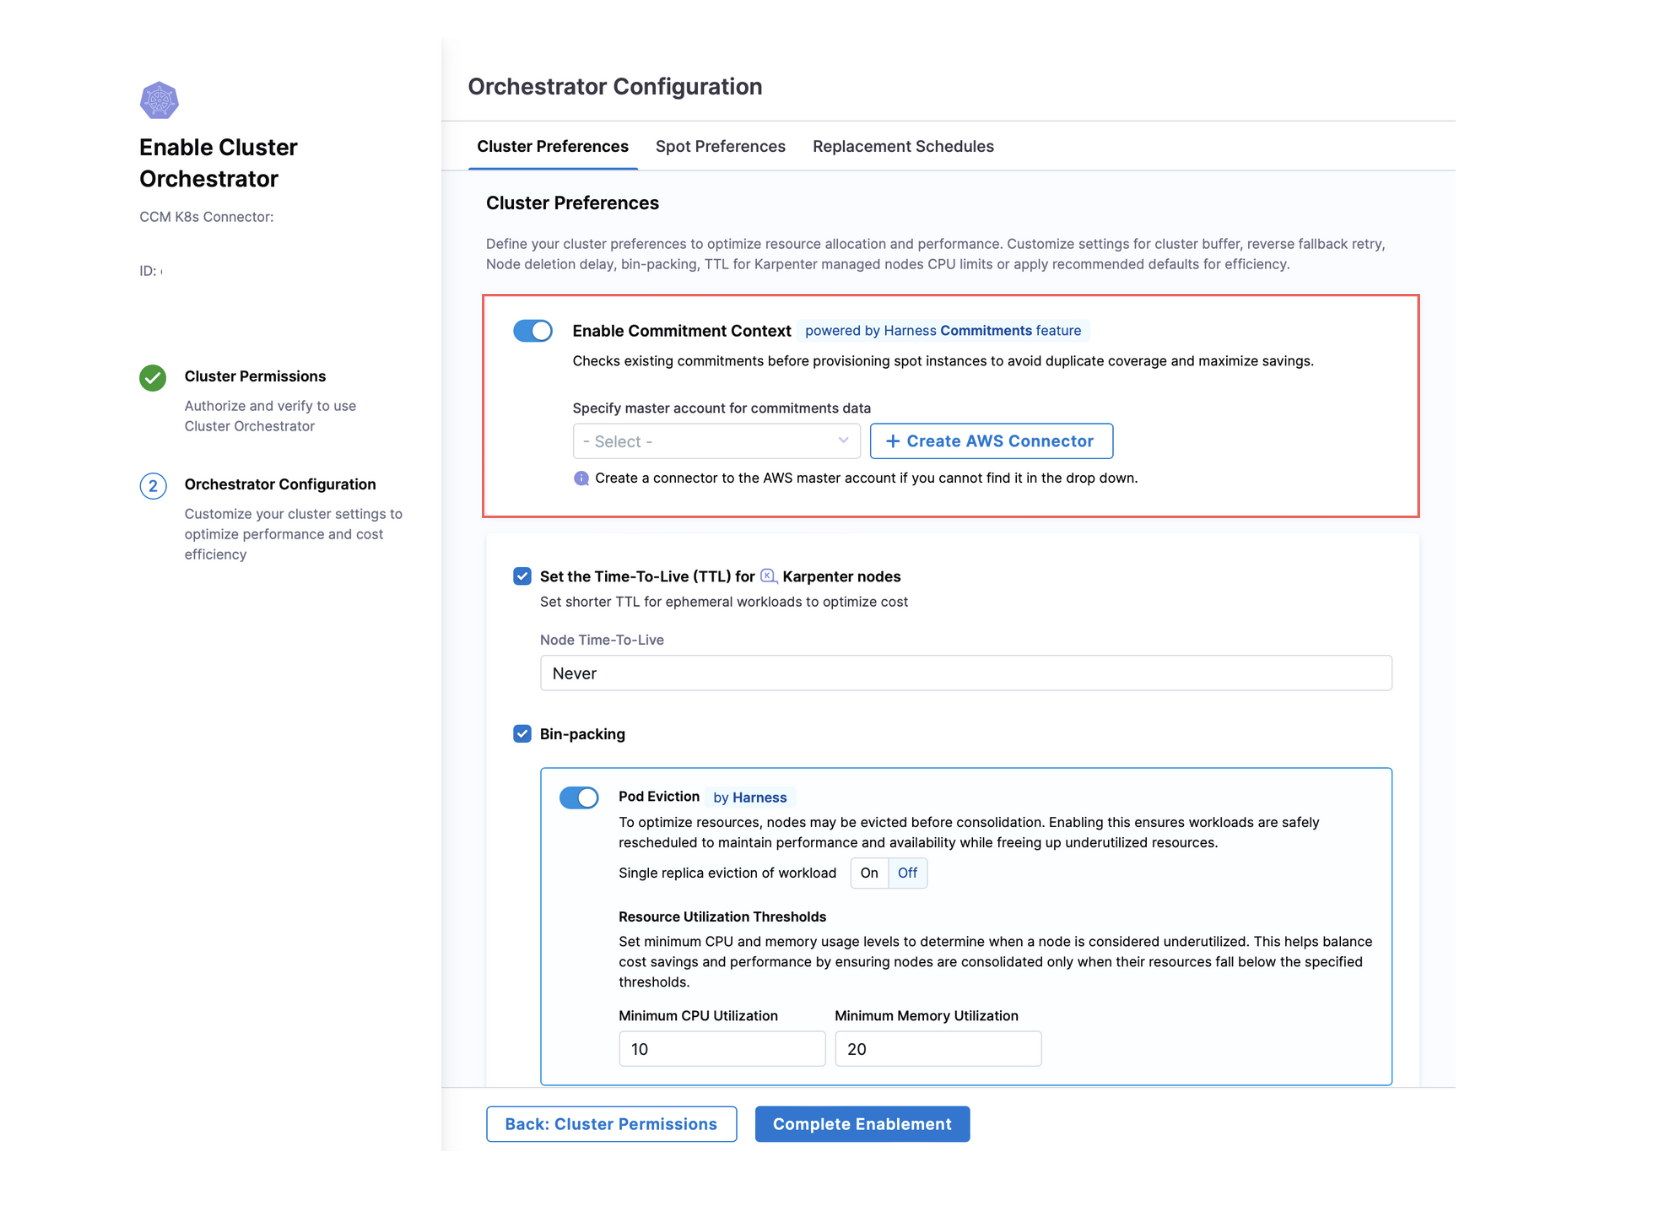
This is an integration between Harness' Commitment Orchestrator and Cluster Orchestrator.
If enabled, Cluster Orchestrator will check existing commitments before provisioning spot instances to avoid duplicate coverage and maximize savings.
Set the Time-To-Live (TTL) for Karpenter Nodes
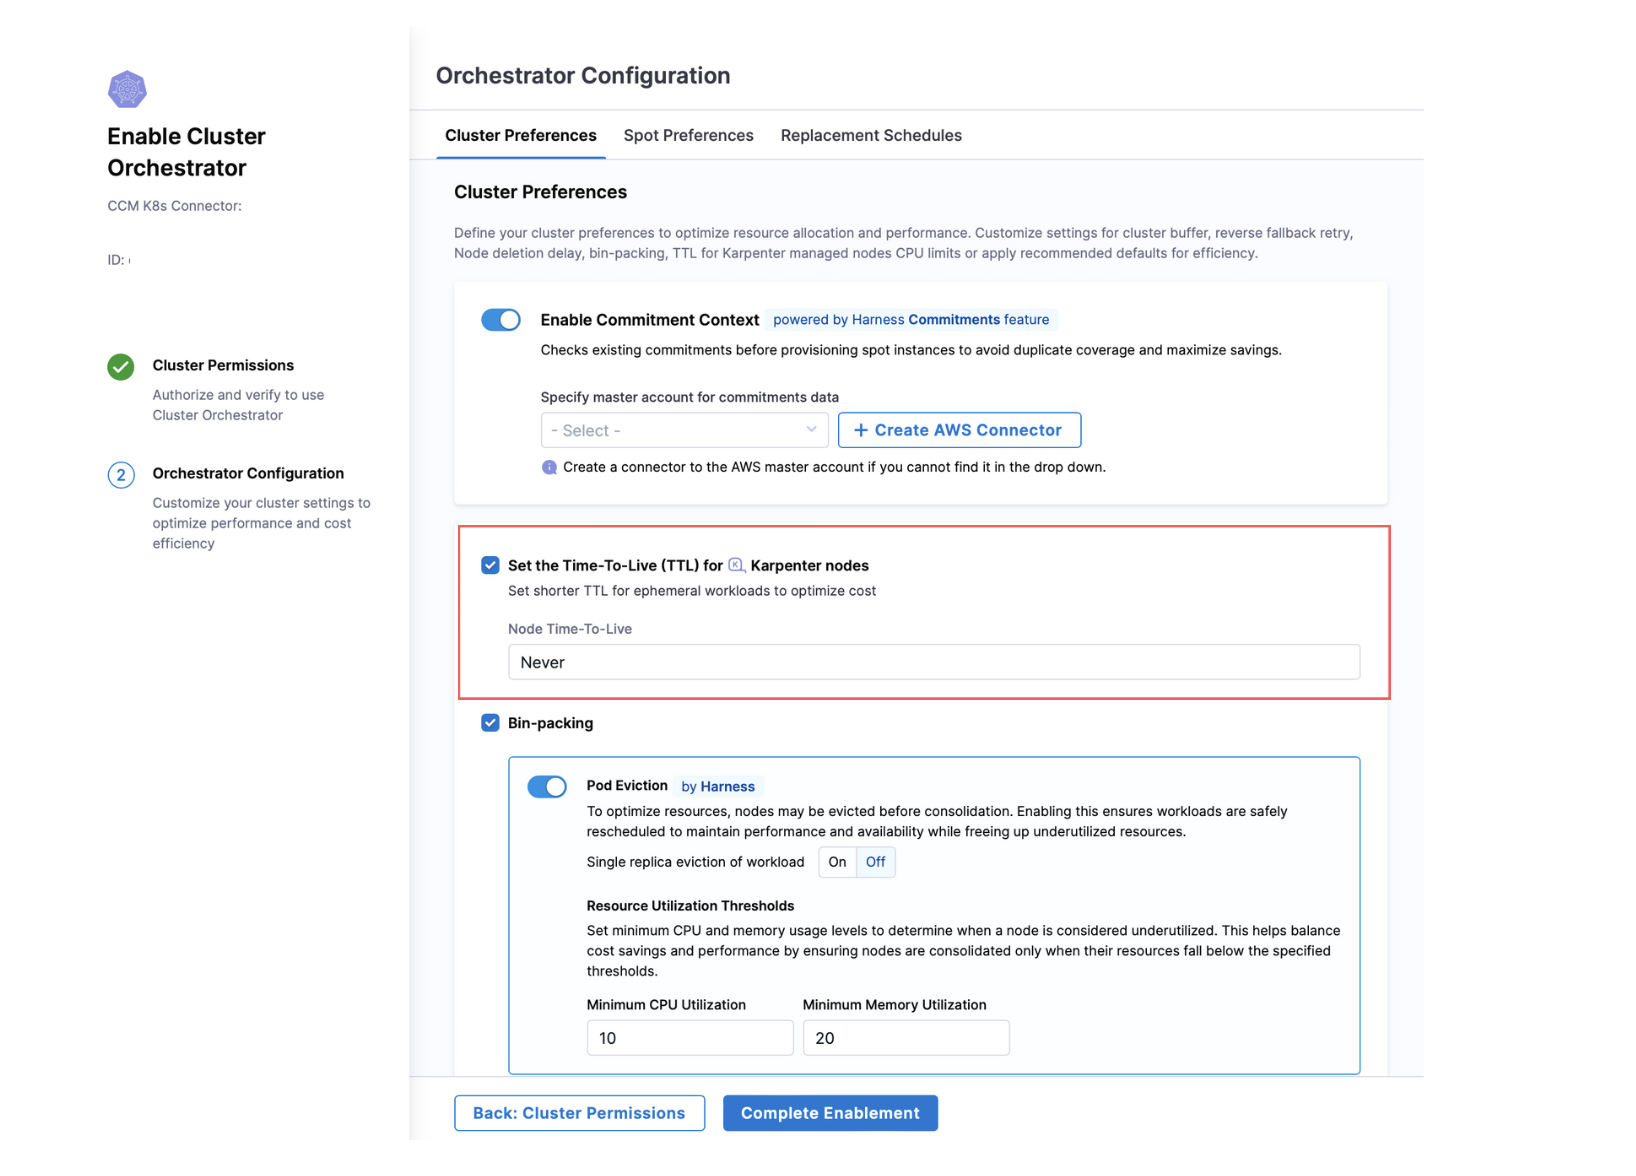
The Time-to-Live (TTL) setting for Karpenter nodes defines the maximum lifespan of a node before it is eligible for deletion, regardless of its resource utilization. By setting a TTL, users can ensure that idle or unnecessary nodes are automatically cleaned up after a specified time period, even if they are not underutilized or empty. This helps in avoiding resource sprawl, ensuring that unused nodes don't linger indefinitely, and optimizing the overall cost and resource usage within the cluster.
Bin-packing
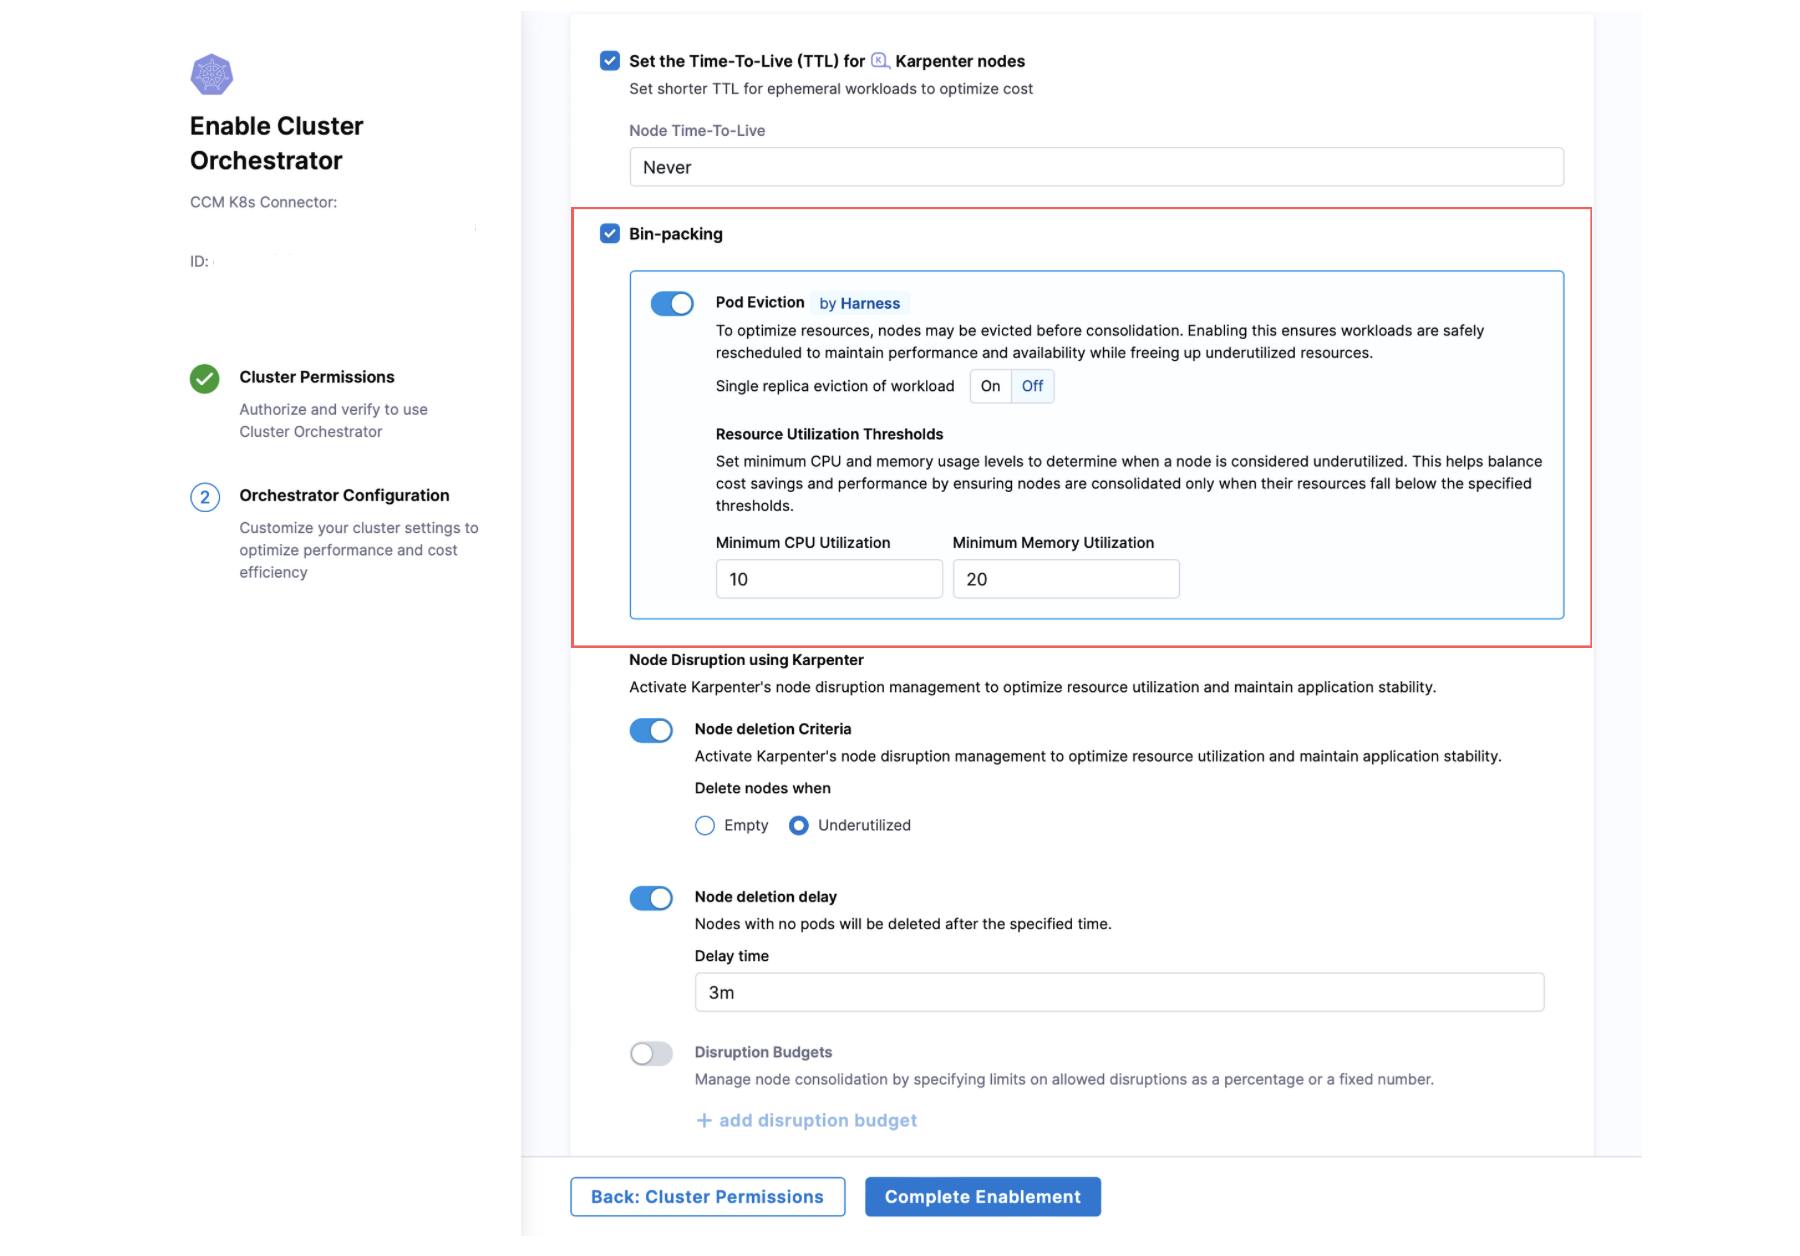
Pod Eviction by Harness
To optimize resources, nodes may be evicted before consolidation. Enabling this ensures workloads are safely rescheduled to maintain performance and availability while freeing up underutilized resources.
Users can set single replica eviction of workload as On or Off.
Resource Utilization Thresholds
This is used to set minimum CPU and memory usage levels to determine when a node is considered underutilized. This helps balance cost savings and performance by ensuring nodes are consolidated only when their resources fall below the specified thresholds.
- Minimum CPU Utilization: [configurable value]
- Minimum Memory Utilization: [configurable value]
Node Disruption using Karpenter
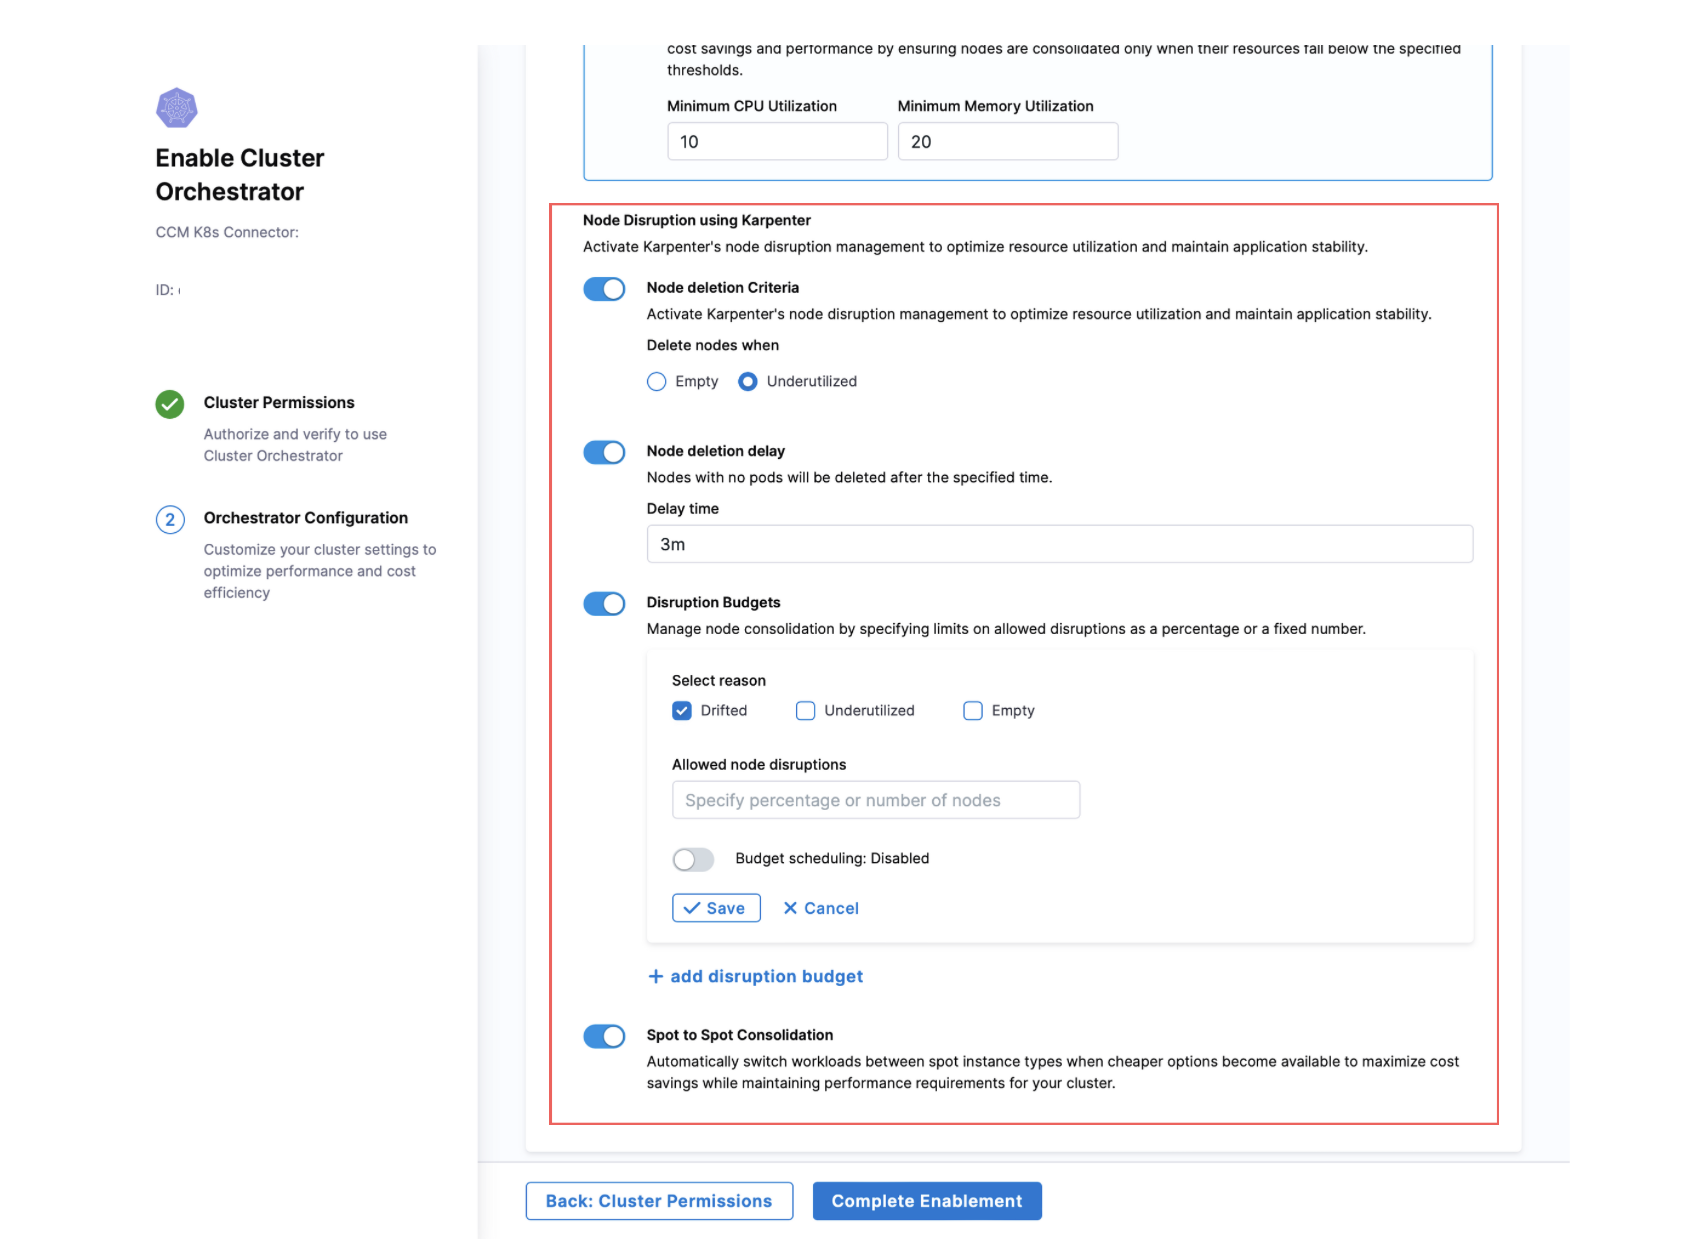
This option leverages Karpenter's advanced node management capabilities to intelligently disrupt and replace nodes based on your defined criteria. Unlike standard Kubernetes scaling, this feature provides fine-grained control over when and how nodes are removed from your cluster, helping maintain both cost efficiency and application stability.
Node deletion criteria
When set to "Empty," nodes that have no running pods will be targeted for removal. When set to "Underutilized," nodes that fall below your defined CPU and memory thresholds will be consolidated.
Node deletion delay
Nodes with no pods will be deleted after the specified time.
Disruption Budgets
Disruption budgets provide a safety mechanism to prevent excessive node terminations that could impact application availability. By setting these budgets, you can control the pace of cluster changes, ensuring that cost optimization activities don't compromise service reliability. For example, you might specify that no more than 20% of your nodes can be disrupted simultaneously, maintaining sufficient capacity during consolidation operations.
Customizable Disruption Rules
You can create multiple disruption budgets to handle different scenarios. For each budget, you can:
-
Select the trigger condition that activates the budget:
- Drifted - When nodes no longer match your optimal instance types
- Underutilized - When nodes fall below resource utilization thresholds
- Empty - When nodes have no running workloads
-
Define the scope of changes by specifying either:
- A percentage of nodes (e.g., 20% of your cluster)
- A fixed number of nodes (e.g., no more than 5 nodes)
-
Schedule budget activation (optional) to align with your business needs:
- Frequency options: Hourly, Midnight, Daily, Weekly, Monthly, or Annually
- Active duration: Control how long the budget remains in effect after activation
Spot to Spot Consolidation
If enabled, this feature will continuously monitor AWS Spot instance pricing across all available instance families and automatically migrate your workloads to take advantage of price fluctuations.
Unlike basic Spot implementations that only react to interruptions, this proactive approach seeks out better deals even when your current Spot instances are stable.
Spot Preferences
This section allows you to configure Cluster Orchestrator's advanced spot instance management capabilities.

Spot/On-demand Split
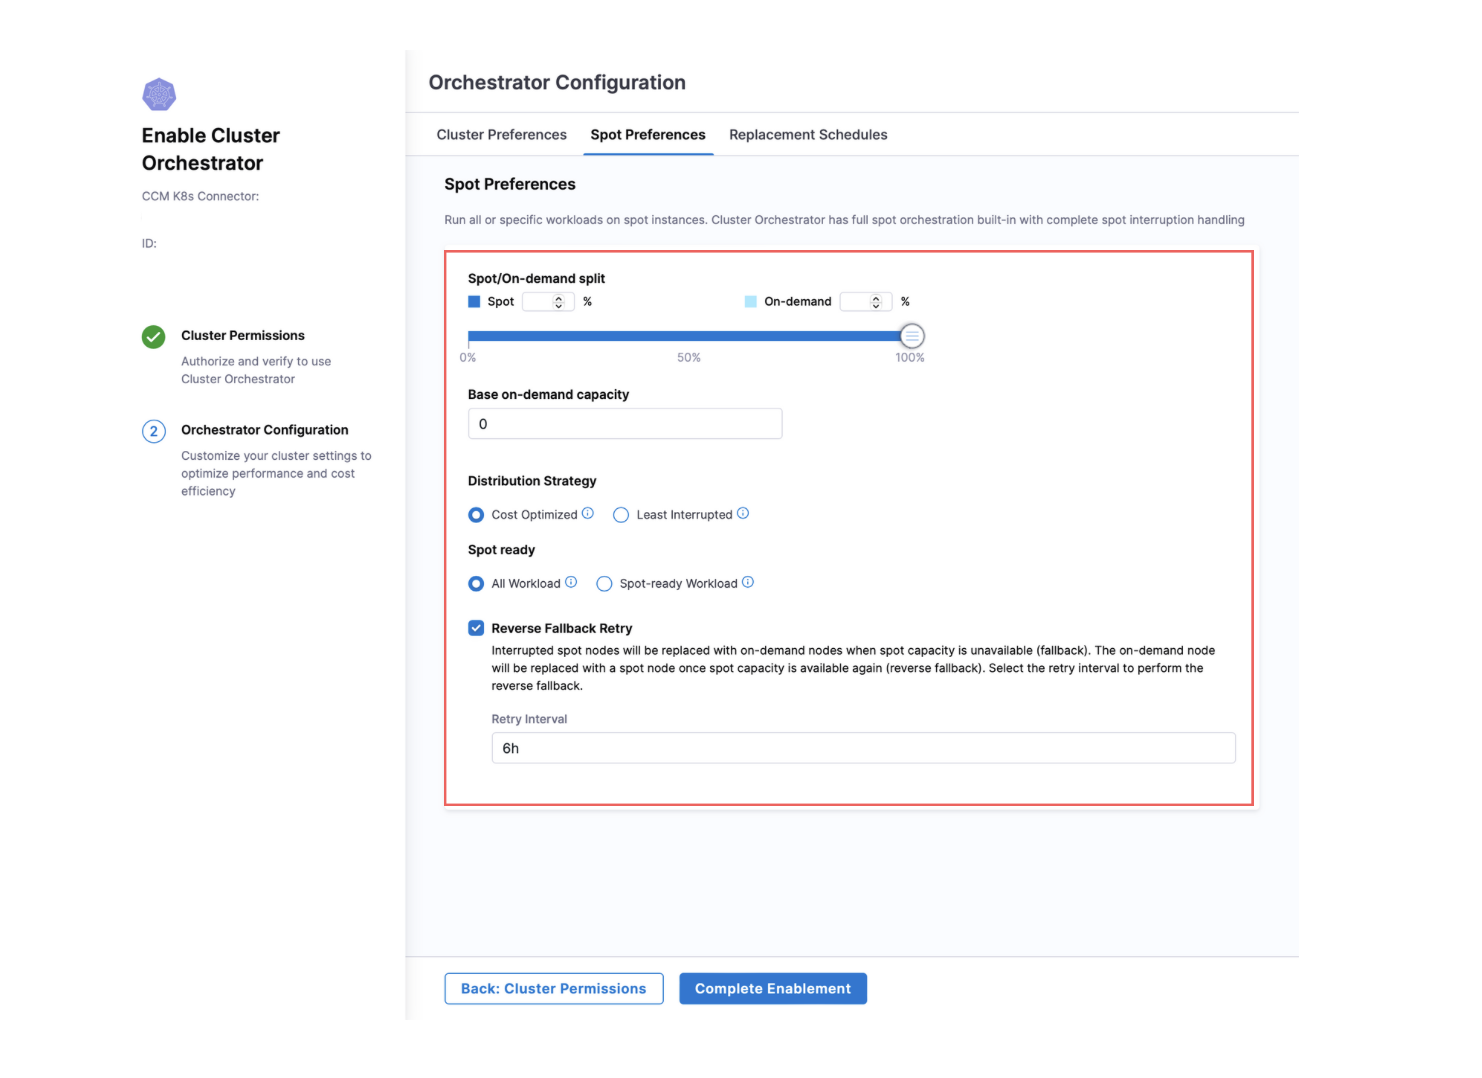
Define the optimal balance between cost savings and stability:
- Spot percentage: Set how much of your capacity should use spot instances to maximize savings
- On-demand percentage: Reserve a portion of your capacity for on-demand instances to ensure stability
Base on-demand capacity
Establish a minimum amount of on-demand capacity that will never be replaced with spot instances
Distribution Strategy
Choose between two optimization approaches:
- Cost Optimized: Spot replicas maximize cost savings by running on the minimum number of nodes from the lowest-priced EC2 pools.
- Least Interrupted: Cluster Orchestrator prioritizes pools with the highest capacity availability to minimize interruptions, distributing replicas across multiple Spot node.
Spot Ready
Determine which workloads can run on spot instances:
- All Workloads: Run every workload on spot instances when available
- Spot-ready Workloads: Only run workloads specifically tagged as spot-tolerant on spot instances
Reverse Fallback Retry
This feature provides automatic recovery from spot interruptions:
- When spot capacity becomes unavailable, workloads automatically fall over to on-demand instances (Fallback)
- When spot capacity returns, the system automatically transitions back to spot instances (Reverse Fallback)
- You can configure the retry interval to control how frequently the system checks for spot availability but only in hours.
Replacement Schedules
Replacement Schedules give you precise control over when optimization activities can occur in your cluster. Rather than allowing Cluster Orchestrator to perform operations like bin-packing or pod evictions at any time, you can restrict these potentially disruptive activities to specific maintenance windows—such as nights, weekends, or periods of known low traffic. This ensures that cost-optimization efforts don't interfere with critical business operations or customer experience during peak hours.

Specify Replacement Window
Cluster Orchestrator offers flexible scheduling options to match your operational patterns:
Frequency Options:
- Always - Optimization activities can run at any time (default)
- Custom Schedule - Define specific days and times when activities are permitted
- Never - Completely disable optimization activities
When creating a custom schedule, you can configure:
-
Day Selection
- Choose specific days of the week (S, M, T, W, T, F, S)
- Or select "Everyday" to apply the same schedule daily
-
Time Window
- Set your timezone (e.g., Asia/Calcutta)
- Choose "All Day" or specify exact hours
- Define precise start and end times for maintenance activities
Applies To
You can select which optimization activities are allowed during the scheduled windows. Currently we support Harness Pod Eviction under Bin-packing.
Once all the details are filled in, click on the "Complete Enablement" button to enable Cluster Orchestrator for the cluster.